
At MyMakerTools we provide what powers your Maker projects and the Maker tools to be creative. This includes USB Power supplies to power your creations, the Maker Surprise line of Bricks & controllers, HO train goodies to make the layout stand out and soft wear to make your life just a little more comfortable.
Monday, October 8, 2018
Maker Faire San Diego
We had an outstanding experience at the San Diego Maker Faire (#makerfairesandiego). We want to thank everyone who helped make it an event to remember. Looking forward to next year. Don’t forget we are honoring the Maker Faire prices until Oct 15 at the store website, www.mymakertools.com .
Saturday, October 6, 2018
First Day at Maker Faire San Diego
Hope everyone is having fun at the first day of the #makerfairesandiego
at Balboa Park! We will be at our booth in the Fleet Science Center
tomorrow October 7 showcasing our Brick Design powered by the #MakerPower control bricks. Don’t forget we are also currently having a sale at the store website, www.mymakertools.com . Hope to see you there!
Here is our booth and some closeups.


Here is our booth and some closeups.


Tuesday, October 2, 2018
Maker Faire San Diego
We will be at the San Diego Maker Faire this weekend. To celebrate,
most items are on sale for the event. If you can't make the Faire, then
checkout the prices on our website.
Friday, August 24, 2018
Mini Maker Faire Sale
With Seattle Maker Faire and the Tulsa Maker Faire, we have lowered the prices for a lot of items. Check out the store to see what we have going. The Sales Prices will be good until 9/1/18.
Tuesday, August 7, 2018
Maker Faires
We will be going to the Maker Faire in San Diego, Oct 6-7. We will have a little of everything by them and will be showing new and exciting things. Dont miss it.

And as a reminder we will be in Seattle Aug 18-19 for the Seattle Maker Faire


These are always a lot of fun and hope to see a lot of people there.
Monday, July 30, 2018
Apps in Google Play Store
We have pushed the initial production releases of the Brick Buddy and the Power Monitor to the Play Store on Google. This allows everyone to view the capability of the apps and the equipment they control. The Apps are free.
Friday, July 27, 2018
Next Things
Well I have recovered from the Bricks by the Bay. Finally sorted my 10 pounds of Bricks that I bought for future development. August is Maker Faire month with one in Seattle and on in Tulsa. Therefore I will be working on cleaning up the product line and finishing the temperature sensor.project.
Also Google is requiring all Apps target Oreo or later, starting on Aug 1. So the next few days will be spent cleaning up the different apps and pushing them to the store.
Also Google is requiring all Apps target Oreo or later, starting on Aug 1. So the next few days will be spent cleaning up the different apps and pushing them to the store.
Monday, July 16, 2018
Planetary Space Base Presentation
I have posted the presentation I gave at Bricks By The Bay. You can find it here.
We had a great time and will post some pictures later.
We had a great time and will post some pictures later.
Monday, July 9, 2018
Bricks by the Bay

Friday, July 6, 2018
LEDs for the Platforms (Part 2)
Here I have mounted a pair to a perf board that I cut up with a dremel tool. If this proves useful, I may do a small PC board for this purpose.

The dome shape is clearly visible on the one laying on its side. In this case, as opposed to the Laser cannon setup, I have included a dropping resistor (120 ohms) in each path. These are SMT0805 resistors. I realize this is not for everyone, but for me it was the most compact method. It is mounted on a 1x4 tile (using the Kragle) so it just snaps into place as shown here.
This dual light set was designed for the vertical generator to be mounted in the charging room across from the glass window in this picture. It will be connected to the random PWM generator to produce a random intensity bright flashing light.

Here is a single mount design. This is intended for mounting on ceilings to light up a compartment with the look of a domed overhead light. I mounted these on 1x2 plates, so that it would be centered and still have some attachment strength.

Finally a lot of the small Laser Cannons are done with robotic arm ball joint. Here is a series of pictures that show how this is done. All of these designs use the PICO LED from BrickStuff. The first design uses a 1x2 round brick to connect to the ball joint.

This design uses a technic 2L connector.


In all cases I had to drill out the ball joint barrel to run the wire. In the first case I also slice one side of the perpendicular connector with an Xacto knife so I could run the wire through the connector. In the second case the hole went al the way though the perpendicular connector since the wire is on the outside.
The challenge with all of these is running the wires. When multiple LEDs are present I will connect the ground returns together to at least reduce the number of wires that I have to hide.
Thursday, July 5, 2018
LEDs fo the Platforms (Part 1)
Started working on the LED lighting. Here is how I did the laser cannons in the original Control Center Platform.
I used the BAR (30359x) as the Laser cannon barrel. The hole in the back end will fit a 5mm LED just perfectly. The only issue is the tube in the 1x2 portion prevents the LED from seating fully. So I use a 5mm drill bit (0.196") to create a counter sink in the tube. It doesn't take much and I want to keep the tube for strength of the connection. While the final result is ruffed up and not as clear as it started, the degradation in light transmitted seems to be minimal. When I first tried this, I completely removed the tube, but the difference was barely noticeable, so I decided to keep the tubes. Also I am using very bright LEDs, >6000 mcd.


This picture shows the completed installation. The dropping resistor is picked to maintain 15-20mA per LED from a USB power source, about 120 ohm.

And here it is with the LEDs on. The light is overwhelming the camera sensor, so it is not very good.

Generally I use red LEDs. But I have used blue in translucent neon orange part before with interesting effects. Unfortunately the camera cannot capture this.
Final detailing will be a red cone on the end probably as seen here in the original control center platform. Since these are further apart, the cross plate will not be used.
Wednesday, July 4, 2018
Jet Pack Base Build (Part 2)
Now that the motor infrastructure is in place, it is time to construct the top.

This sequence of pictures shows the construction of one of the tower base supports.


I had originally started with bars in TAN, but did not like the look. I had black ones so tried them. They are not perfect, probably Sand Green would have been best, but they are not available. Also had two on each side, but the edge showed though, so I reduced to one on the right facing side.


Now some Minifig detailing is added.

Finally the front glass is installed. Spare Jetpacks are hung on the walls. Two Minfigs are in line to board the elevator and two are on the elevator.

This shows the covering with holes for the drive shafts for the two towers and the hole for the rising platform.

This sequence of pictures shows the construction of one of the tower base supports.


I had originally started with bars in TAN, but did not like the look. I had black ones so tried them. They are not perfect, probably Sand Green would have been best, but they are not available. Also had two on each side, but the edge showed though, so I reduced to one on the right facing side.


Here is both towers and the back wall. For the deck plating I went with Light Bluish Gray (LBG) tiles and tiles with blue and lime accent. While not evident in the pictures, the LBG is from old sets and there is some discoloration in the tiles, greenish from UV exposure probably. This gives it a used look that is more realistic. In the model train world this is called weathering.

Shown here is the rising platform. As I may have said in an earlier
post, I have given up on motorizing this feature for now. Not enough
time.

These two pictures show how the support section for the towers was built.


This next set of pictures shows the detailing. First the side glass is installed.

Now some Minifig detailing is added.

Finally the front glass is installed. Spare Jetpacks are hung on the walls. Two Minfigs are in line to board the elevator and two are on the elevator.

Next time we will finish up the Jetpack Base, waiting on some bricks to arrive.
Monday, July 2, 2018
Jet Pack Base Build (Part 1)
The final platform is the Jet Pack base. This is intended to be an area where the Jet Pack Squadrons work from. There will be two squadrons the Blue and Green, which will be designated by the detailing of each minifig.
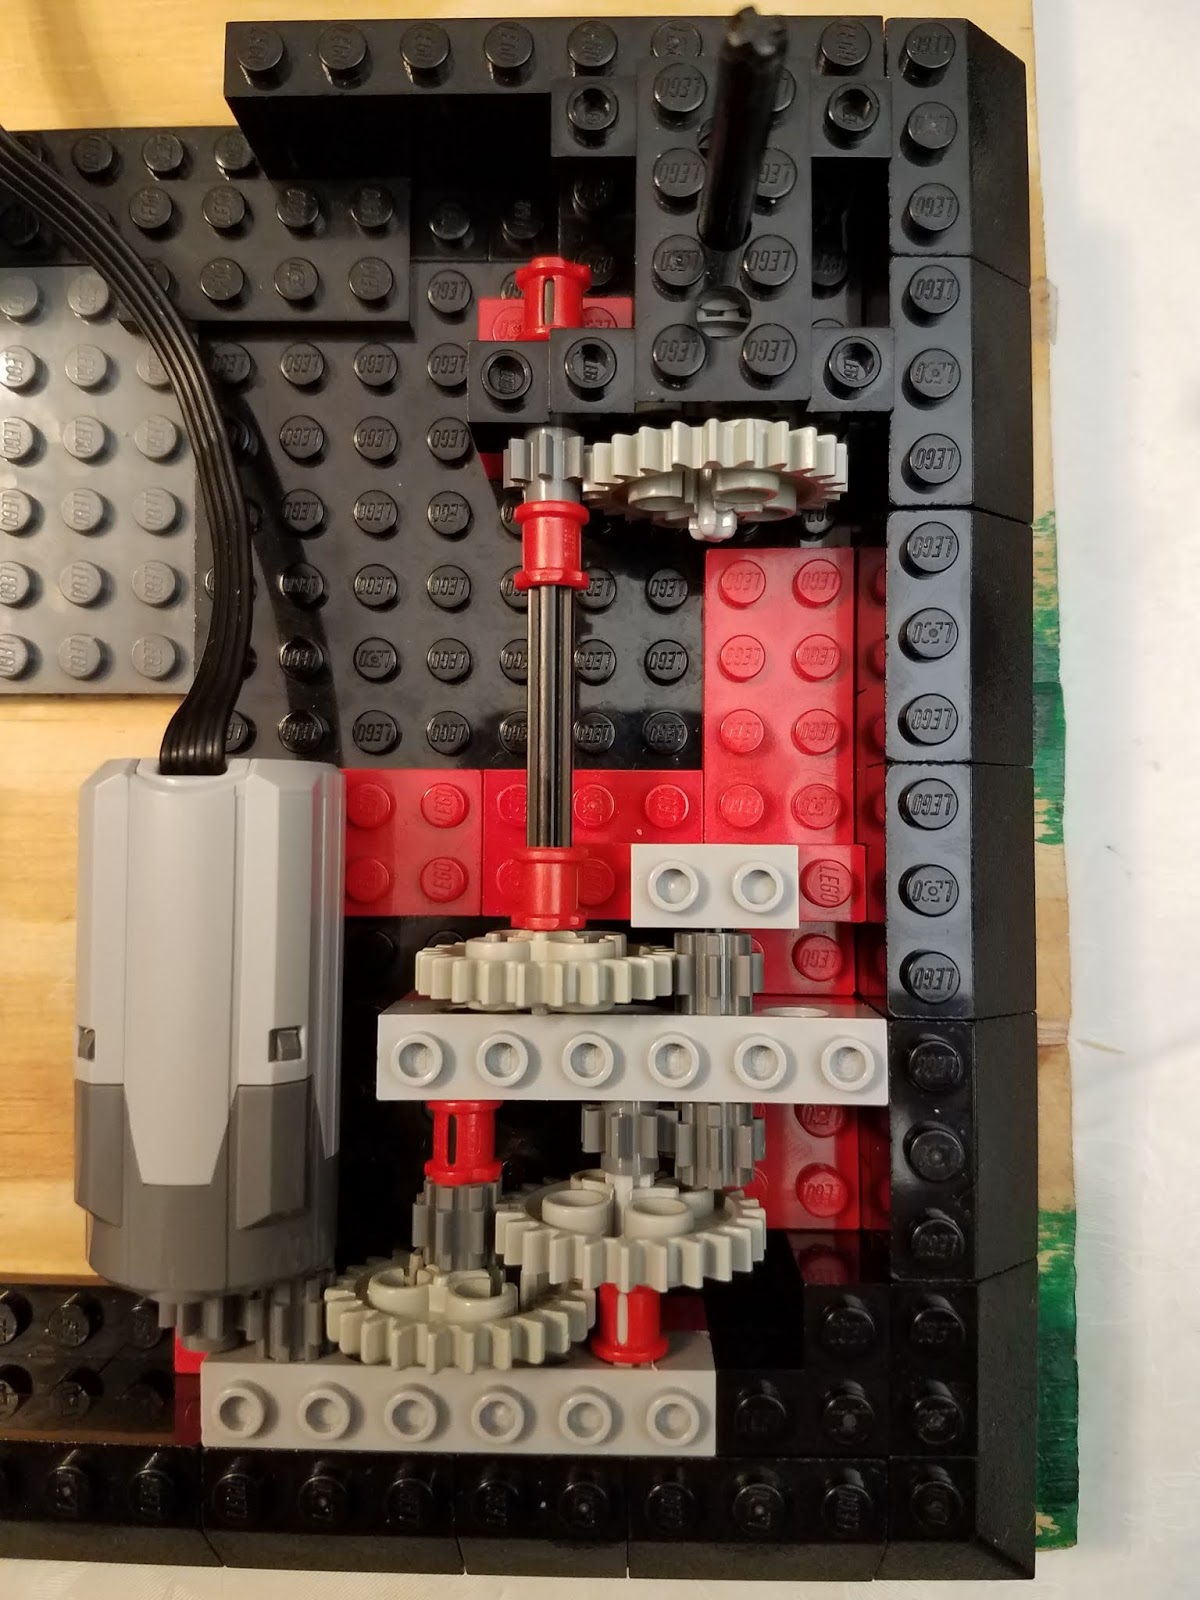
There are two motors controlling antennas for each squadron. Below is what the base looks like with the gear trains installed. The first one is the full view of the platform.

This is a closeup of one side. I wanted the antennas to spin a little faster than other ones, so the gear reduction is not as great and I may still take it down some more.
 You will notice that the base platform was modified to squeeze the motor and gear train into the corners as much as possible.
Here is the what it looks like with the top framing installed.


Initially I wanted a rising platform in the center back for moving the Jet Pack Minifigs from the outfitting area to the launch area, but this just became too hard for the time frame I have. So I built this with as much space a possible for this. If I get everything else done for Bricks by the Bay, then I may revisit this.
There are two motors controlling antennas for each squadron. Below is what the base looks like with the gear trains installed. The first one is the full view of the platform.

This is a closeup of one side. I wanted the antennas to spin a little faster than other ones, so the gear reduction is not as great and I may still take it down some more.
Here is the what it looks like with the top framing installed.


Initially I wanted a rising platform in the center back for moving the Jet Pack Minifigs from the outfitting area to the launch area, but this just became too hard for the time frame I have. So I built this with as much space a possible for this. If I get everything else done for Bricks by the Bay, then I may revisit this.
Sunday, July 1, 2018
Horizontal Generator Build (Part 3)
I had this large area out in front on either side that I was trying to decide what to do.

At one point I was thinking about a crane to lift the canisters out of the charging area, But this looked very complex to be able to rotate both in azimuth and elevation. So I started thinking of other options. One one of my many visits to the Lego store I took pictures of the $800 Falcon. I was fascinated with the detailing that had been done as shown here.

and the detailing in the new Y-Wing shown here.

So with this as inspiration, I came up with this.


This is still a work in progress, though the theme is mostly done. What I learned was that light bluish gray (LBG) on LBG doesn't work. You will notice that the first picture has more dark bluish gray (DBG) as the underlying structure and all of the texture parts are LBG. This has a much look as the texture stands out. Still need to find transparent dark blue bars to replace the transparent light blue ones. There will be some other tweaks as well. Overall I am happy with the way this turned out. Will probably extend this design detail to the laser cannon platform as well.

At one point I was thinking about a crane to lift the canisters out of the charging area, But this looked very complex to be able to rotate both in azimuth and elevation. So I started thinking of other options. One one of my many visits to the Lego store I took pictures of the $800 Falcon. I was fascinated with the detailing that had been done as shown here.

and the detailing in the new Y-Wing shown here.

So with this as inspiration, I came up with this.

Here are closeups of each side.


This is still a work in progress, though the theme is mostly done. What I learned was that light bluish gray (LBG) on LBG doesn't work. You will notice that the first picture has more dark bluish gray (DBG) as the underlying structure and all of the texture parts are LBG. This has a much look as the texture stands out. Still need to find transparent dark blue bars to replace the transparent light blue ones. There will be some other tweaks as well. Overall I am happy with the way this turned out. Will probably extend this design detail to the laser cannon platform as well.
Saturday, June 30, 2018
Jet Pack Base
Here are the first looks at how I am modifying the Blacktron II Minifigs with the jet pack.
On the back is a 1 x 2 plate with handles (3839) that is inserted into the jet pack. Then two 1 x2 bricks are attached. The detailing includes a round tile, antenna, beacon light and thruster underneath.

 In keeping with the blue/greenish theme of the power generators, there will be two squadrons. A blue one and a green one. The blue is fairly easy, all the parts needed come in transparent dark blue. The green is a little harder. The power generators have used Lime. That is not available in the antennas or in a transparent color. So I am going with transparent bright green for now. The only item I cant get is the minifig visor, so it will stay with the original Blacktron II color. Once the part come in, I will post the final look.
Still need to find a way to get some of these in the air to look like they are flying without any support.
On the back is a 1 x 2 plate with handles (3839) that is inserted into the jet pack. Then two 1 x2 bricks are attached. The detailing includes a round tile, antenna, beacon light and thruster underneath.


Still need to find a way to get some of these in the air to look like they are flying without any support.
Tuesday, June 26, 2018
Laser Cannon Platform (Update 2)
I started on the platform for the Large laser cannon. I want to be able to control the azimuth of the large cannon and the two smaller twin cannons separately. That meant three motors. So here is the gear train for the large cannon. To make it slow enough (dont have PWM motor control yet) I needed a 5 stage gear. This is as tight as I could make it.
I probably could have used the technic gear box to change direction, but I felt the large turn table was better for moving such a large piece.

A closer view.

Here is how the small twin cannon control looks. This uses a technic gear box to change direction.

This picture shows why the long axle was used. Even though there is plenty of room on the left side for more gears, the right side is constrained by the large cannon gear train and motor. Since I wanted them to be the same, I used the long axle to place two gear reduction stages up by the motor then 3 more by the gear box. Used most of the space.

Here are two close ups of the right side with both gear trains.


I suspect I will have to make some adjustments in the support members around these gear trains so that the deck plating can be installed. But the generic platform design is flexible enough to allow for this without compromising any structural integrity.
Next task on this platform is to build the deck plating and attach the laser cannons and the overhead power structure.
Monday, June 25, 2018
Large Laser cannon Housing (Part 2)
I wanted to be able to control the elevation of the Laser Cannon and have it recoil with each shot. I gave up on the recoil as just to hard for now as getting one motor in there was going to be difficult enough, much less two.
Here are two quartering views. The gear train starts on the left side and goes up and then towards the front of the housing.

Then it goes across the housing on a long axle. Then reverses itself by going towards the back and down and back to the front where it engages the cannon carriage.

Here you can see how the motor mounts and connects to the gear train.


Next I will close up the housing and finish detailing it.
Subscribe to:
Posts (Atom)