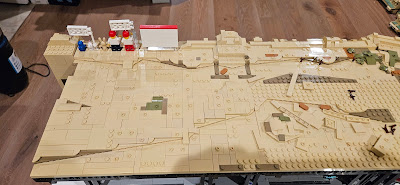
Now the other side of the center area. This is the same idea as the left side. One difference is the end of this section is over the space port, so additional detail was required.
The first steps is to place tiles on the areas that will be the bottom of terrain. Then plates where the raised terrain will be. The plates and tiles are the same level. Then on top of the plates will be the wedge plates that make the raised terrain and create some irregularity in the edges.
On the end that overlooks the space port, a little more was done. This will eventually have some cliff work that will provide a sloping finish, so the idea that it goes on does not exist here. Thus the end of the raised terrain has a rounded finish.
This side will have the "bling" that we get at various shows.
This picture and the next set show the tiling of the raised terrain. Plus going back and placing jumper plates and normal plates so that there are studs for attachment.
As on the other side, I have used dark tan, olive green and medium nougat tiles to breakup the monolithic tan look
The last two pictures are the finished look, before final detailing. One other item that is not obvious.
There are eight modules in each side, as shown. The cliff and the platform behind it, times 4 sections. These are held together with Plate, Modified 1 x 4 with 2 Studs.
The above pictures show the part and where they are. These are done in dark tan so that they are easy to spot. During disassembly looking for where the connection in is a sea of tan, was getting too difficult. When they are pulled out, they are placed on the top of the platform on any available stud. Then during assembly it is much easier to spot these parts.


No comments:
Post a Comment