Thursday, September 21, 2023

Space Cannon Rebuild

Prior to going to Brick Fest Live in Sacramento, the Space Gun needed some maintenance.  Wasn't quite sure which motor connector was connected to what motor.  Both of the small guns would not turn.  And it appeared that the main gun would not turn.  From this picture it is hard to see, but when the cliff is finished there, the power canisters on the back are going to have to move.  There will not be enough room for all of that to and still maintain the walkway.

 I took it partially apart.  The main gun gun was not sitting on the turntable correctly and kept coming off.  There needs to be a better connection system than what there is now.

On one of the small guns, the horizontal axle had some how pulled back (to the left here) and was no longer engaging the gear.  Thus the axle would turn, but the gear would not.  This caused the mating gear not to turn and in the end the small gun.  You could hear the motor turning, but nothing was happening.

The other small gun had a different issue.  The horizontal axle was in enough to engage the gear, but it went just far enough to cause the vertical axle to be pushed to an angle.  This picture is an exaggeration, but it shows the problem.  The vertical axle was being pushed down by the small gun when it was attached.  Then the vertical axle would slip off the end of the horizontal axle and cause the box to grind.  Sometimes the axle would pass through the 2 x 2 round plate with axle hole and not be connected to this round plate.  That also would cause the small gun not to turn, as this round plate was connected to the vertical axle and then this round plate was connected to the turntable that made the small gun move.

This module is still using an old Brick Controller and needs to change to one of the new ones.  When this is done, some of the gearing can go away since I will be able to PWM the motor for speed control.  At that point there will be some major modifications for the Space Gun.


Wednesday, September 20, 2023

Space Outpost SL ONE - The Story


This year at the shows, a story line has developed.  I guess every large display needs an over arching story line to go with it.  One it is interesting for the visitors and it helps guide development of the display.

So here goes.

The Starfleet Voyager has just returned from it's latest mission.  The droids are busy restocking and preparing for the next mission.

The crew of the latest mission are marching into the Space Port with their injured comrades.  Additionally the local jet pack patrol is preparing to launch from the Space Port on their mission of local patrolling around the Space Outpost.

In the briefing room in the center section, the next crew is preparing for their turn on the Outer Rim defense.

Meanwhile in the Power Well, one of the Maintenance Team ( as designated by the M on their fronts) has fallen down into the well.  A team member is struggling to get him out.  All the while 3 supervisors look on wondering how this happened.

A droid had had a serious malfunction and blown his top, with fire coming out of the top.  Three Maintenance men are discussing the best approach to fixing this problem.

At the Vertical Generator, they are busy charging up the power canisters that the outpost needs for power.  The two Red Spacemen run the charging while the two on top monitor the generator along with the two in the Vertical Generator control room.


On the other end of the outpost, the Maintenance team is busy preparing the last of the Cosmic Ray Guns.  The small MECH is helping install the gun, while the rest of the team is preparing the pad for the generator.  The generator is hanging over the space right now. 


In the hanger bays, work continues.  Different work groups are working on walkers and the larger MECH.

Here we see three dedicated Maintenance Team members working on repairing the floor of this hanger bay.  All of this hard work, while three supervisors enjoy their coffee and doughnuts.

Finally a rogue droid is running loose and has attached itself to the side hanger support pillar.  Three Maintenance Team members and two Blue droids are working on recovering this larger worker droid.  One brave member of the Maintenance Team has climbed down an extension pole to try and reset the droid while everyone else looks on.

This is the story for now,  As more detail is added, I am sure this will expand.


Tuesday, September 19, 2023

Brick Fest Live Sacramento - Day 2


 As in Day ONE they were lined up around the building waiting for the doors to open.  While the crowd was little smaller on Sunday, they made up for that in enthusiasm.  


I am so grateful for the 360 degree access.  It made all the difference in the enjoyment of the display.  The kids were over joyed that they could see the back side and the detail in the hangers.  It also allowed for everyone to see inside the center section better.

There were minimal other displays at this event.  No Lego Users Group participated.   There was the Boy Scout Camp/Civil War Re-Enactment/Zoo from last time.  One other person who was doing Nike shoes in Lego.  Several comments from adults were made that there were not many displays to look at as in previous Lego events (not necessarily just Brick Fest).  Though there was a lot for kids to do.

Take down was about 15 minutes slower than last time.  The boxes need more descriptions on the outside.  I should also probably take a picture of what goes inside and print that out.  While the bigger pieces are obvious where they go, the extras may not be.  A printed picture in every box or maybe on the inside of the lid, would be helpful.  I am finding the the two conductor wire is easier to connect and disconnected than the single wire twisted that I have been using.  So as time goes along, this is probably the direction I will be going with the interconnecting wire.

Finally I still need some more thought into assembly/disassembly.  I really need to get this down to 3 to 3.5 hours in assembly and less than 2 in disassembly.


Monday, September 18, 2023

Brick Fest Live Sacramento - Day 1


 As described in the previous post.  We had a 360 degree access setup this time.  It made a much bigger impact than in previous shows.


The crowd on Saturday was actually very good.  The hall was as large as the one in San Diego.  Brick Fest had all of their usual activities, several build areas (swimming pool bricks, white spires and just generic bricks), the black light build area, the floor mosaic, the Star Wars cosplayers and the brick walls, etc.

And we had a stream of people.  I had to be careful to be mindful of the people behind me, so I did not block any views of the people looking at the back.

And on to day TWO.


Brick Fest Live Sacramento - Setup


Setup was the same as always, though by the time we unloaded, parked the car and got started, it was already almost 1PM.

The setup uses two 8 foot tables.  In the past the center module has always been near the table break.  This has put large stresses on the joints where the modules connect to the center.  This time I started building on one end and very near the end of the tables.  This would place the table break somewhere in the the last two modules on the left side.  I was hoping that those modules were less susceptible to the stresses.  It turns out this was a very good decision.

This next set of pictures shows the various stages of setup.  Basically I start on one end and just move down the line  When I get to the modules with the cliffs and hanger bays, these are assembled as a slice and then that slice inserts into the next one.  The other important item is to check power as I go.  I do not want to have the whole display assembled and then some small buried doesn't work.  That would not be good.

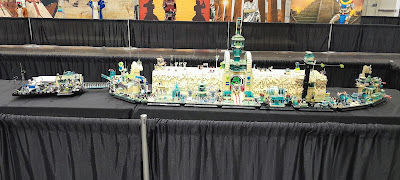
The big change was we were moved to our own area and thus had a 360 degree display.  People could see both the front and back.  This was a big change for viewing the back, since people could only see it from the side at an angle.  This time they could as close to the back as the front.


And we are done!  

This time the asembly took between 2 and 2.5 hours.  So we finished with assembly around 3:15PM.  Then we spent the next hour, detailing, fixing things that came loose during transport, etc.  Thus we left the hall just after 4:30PM.


Thursday, September 14, 2023

Space Port Cliff

Ever since I first built the space port, I wanted to somehow have a passageway go into the cliff wall.  In the past few months I have concentrated on the other direction, thus the floating platform.  Now I am starting on this idea.

First off, to meet the level of the Space Port back entrance, I needed to lower the cliff base platform.  This picture shows the transparent light blue glass passageway that will go through the cliff.

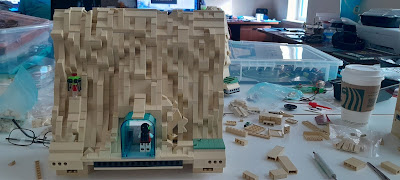
This is from the back side of the cliff.  Again the base platform had to be lowered in the center.  From this view you can see the hole for the LED lighting wiring.

Here  I am playing with space utilization.

Which leads to this layout.  More storage for the jet packs on either side.  Computer screens on either side of the passageway.  These screens will be used to provide information on scheduled missions.

Then we have one more display where the Balcktron Logo will go.

Here the cliff is about 75% complete.  What is different here, besides the passage is how the cliff was modeled.  The Space Port is always intended to the be at the end.  Otherwise the floating platform will not have space on a normal table top.  And it is always meant to be on the left end.  This is more a function of the floating platform and how the maintenance shed is oriented.  Thus the cliff to the left of the passageway has not been mined back like all of the other cliffs.  There is no sand green walkway.  Even to the right of the passageway, the cliff is not fully teraformed.  The sand green walkway ends abruptly and there is still rock there.  

About 90% complete.

Now it is done.  This took a few cups of coffee to complete.

Here is the backside in its current form.  Not sure this is the final detail.

A close up view.  Part of the reason I am not sure this is done, is the blank walls above the computer screens  But there may not be anything I can do about that.

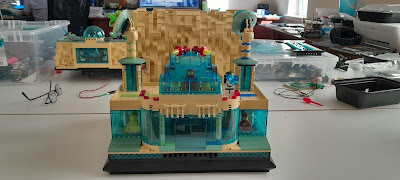
This is what it looks like backing the Space Port.

Here is a side view showing the passageway connecting to the Space Port.

There is no LED Lighting yet.  The bottom floor will be well lit.  As with the the other cliffs, not sure what goes on the second floor.  The hanger area behind this will also be different and have more living space detail.