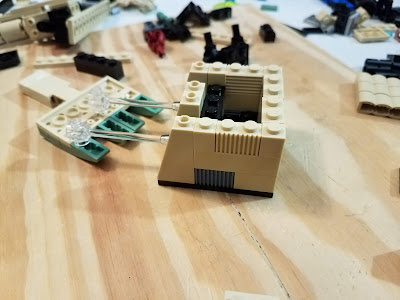
Here are the first looks at how I am modifying the Blacktron II Minifigs with the jet pack.
On the back is a 1 x 2 plate with handles (3839) that is inserted into the jet pack. Then two 1 x2 bricks are attached. The detailing includes a round tile, antenna, beacon light and thruster underneath.
In keeping with the blue/greenish theme of the power generators, there will be two squadrons. A blue one and a green one. The blue is fairly easy, all the parts needed come in transparent dark blue. The green is a little harder. The power generators have used Lime. That is not available in the antennas or in a transparent color. So I am going with transparent bright green for now. The only item I cant get is the minifig visor, so it will stay with the original Blacktron II color. Once the part come in, I will post the final look.
Still need to find a way to get some of these in the air to look like they are flying without any support.

At MyMakerTools we provide what powers your Maker projects and the Maker tools to be creative. This includes USB Power supplies to power your creations, the Maker Surprise line of Bricks & controllers, HO train goodies to make the layout stand out and soft wear to make your life just a little more comfortable.
Saturday, June 30, 2018
Tuesday, June 26, 2018
Laser Cannon Platform (Update 2)
I started on the platform for the Large laser cannon. I want to be able to control the azimuth of the large cannon and the two smaller twin cannons separately. That meant three motors. So here is the gear train for the large cannon. To make it slow enough (dont have PWM motor control yet) I needed a 5 stage gear. This is as tight as I could make it.
I probably could have used the technic gear box to change direction, but I felt the large turn table was better for moving such a large piece.
A closer view.
Here is how the small twin cannon control looks. This uses a technic gear box to change direction.
This picture shows why the long axle was used. Even though there is plenty of room on the left side for more gears, the right side is constrained by the large cannon gear train and motor. Since I wanted them to be the same, I used the long axle to place two gear reduction stages up by the motor then 3 more by the gear box. Used most of the space.
Here are two close ups of the right side with both gear trains.
I suspect I will have to make some adjustments in the support members around these gear trains so that the deck plating can be installed. But the generic platform design is flexible enough to allow for this without compromising any structural integrity.
Next task on this platform is to build the deck plating and attach the laser cannons and the overhead power structure.
Monday, June 25, 2018
Large Laser cannon Housing (Part 2)
I wanted to be able to control the elevation of the Laser Cannon and have it recoil with each shot. I gave up on the recoil as just to hard for now as getting one motor in there was going to be difficult enough, much less two.
Here are two quartering views. The gear train starts on the left side and goes up and then towards the front of the housing.
Then it goes across the housing on a long axle. Then reverses itself by going towards the back and down and back to the front where it engages the cannon carriage.
Here you can see how the motor mounts and connects to the gear train.
Here I have installed the cylinder housings. These just barely fit and there may be some very slight touching.
Next I will close up the housing and finish detailing it.
Sunday, June 24, 2018
Large Laser Cannon Housing
**** NOTE: Some of the pictures are a little out of focus ***
Here is the housing that holds and elevates the large laser cannon. The front frame is mae from three types of techinc lift arms.
1 x 5 straight (32316), qty 2
1 x 11.5 double bent (32009) qty6
2 x 4 L shape (32140) qty 2
1 x 2 technic brick with two holes (32000), qty 2 and the pins to connect them for connecting the top
1 x 2 techinc connectors (11458) and the pins to connect them for connecting to the base.
Below are different views of the front frame.
This is the simple clamp that will help hold the frame to the base.
Here it is attached to the base and holding the frame.
Temporarily attaching the half circle plates.
Some detailing with fluted 1 x 2 bricks to simulate vents.'
Next will be the gearing to elevate the large laser cannon.
Friday, June 22, 2018
Large Laser Cannon
Using a couple of example designs, I came up with this for the large Laser Cannon barrel.
Using the robot body part, 30361, I started building the front part of the cannon.
Then using 1L technic connectors, I connected to pieces together. The technic pins are for detailing later on.
Then a long axel to form the basic structure for the extended barrel.
Now several gears and pulleys followed by three 2L technic connectors to form the final body of the cannon barrel. The small gear at the end is holding it all in place for now.
Built another body for the back end.
Connected the two bodies with an axel and some more gears.
Built a carriage so that I can change the elevation of the laser cannon.
Here is another view of the carriage assembly.
Final design for now. The detailing on the sides is still up for consideration. Not sure I like it and it seems to be getting in the way of elevating the cannon. Final effort will be putting an LED at the end. Running two wires down the barrel will be fun.
Thursday, June 21, 2018
Laser Cannon Platform (Update 1)
Well did some playing around with the overhead structure. I started with this.
And ended up here.
To clean it up some, I will have three green and three blue domes, the neon yellow will be replaced. This is keeping with the blue and lime green color scheme for power. The vertical supports will have the same detail as other places with generators.
I had an interesting time with the hose connections. The hoses were too short to reliably connect. The stress created by the curving would cause the 1x2 brick to disconnect. What I ended up doing was putting two 1x2 Technic bricks together (one with 2 holes and one with 1 hole) and some pins to hold the hoses in. Then placed this on a small 2x2 turntable. This completely relieved the stress on the bricks and actually made for a interesting detail. Once i get the parts in the for large laser cannon I will do a complete writeup on how the majore details of this platform.
The final issue is lighting this. What I would like and what I can do are probably far apart. More on this later.
Seattle Maker Faire
We will be at the Seattle Mini Maker Faire on Saturday/Sunday August 18-19. Hope to
see all of you in the Great state of Washington. Not sure what we will be
showing, but keep watching this blog or follow us on twitter to see
what is happening, @MyMakerTools and #MakerPower.
Wednesday, June 20, 2018
Laser Cannon Platform
Not sure where this is headed. I started wanting to build two large power stations as used else where. But then this happened. May be headed towards open frame structure.
Small Dual Laser Cannon
It starts with a simple 4 x 6 plate and two hinges for the cannons.
A different view. I am using black because I want the insides to be dark. Unfortunately it is hard to see the detail in these views.
Here the clear cannons are attached. Later they will be fitted with LEDs.
Looking closely at the back, you can see 1x1 void. This is for running the wires to the LEDs.
Here I added a 1x4 plate to connect the cannons together. Eventually I added another to help make the inside darker.
Added the slopes.
Here I have added the walls. There are two fluted bricks that are meant to be vents. I used a sand blue one to offset the color and make it stand out. Then single tan one just fades in.
The problem with placing these fluted bricks at the end is shown above. Don't like this.
So I moved it over by using 1x1 bricks on either side.
As you can see here there is no exposed edge as above.
This is the almost finished laser cannon. Waiting on one part to arrive.
Tuesday, June 19, 2018
Center Platform (Update 2)
Here is probably close to the final design on the center platform.
Also looking at whether the spotlights or a rotating laser cannon makes sense on the top structure. Here is what that looks like.
I don't have another structure that the under carriage type laser cannon really fits. But at the same time the spotlight fits the purpose more.
Using the inverted radar dish on a small turntable, I have created a small remote controlled laser cannon. Still need some more sand green slope parts to finish this detail and then duplicate on the other side. Here is a closeup view
I don't have another structure that the under carriage type laser cannon really fits. But at the same time the spotlight fits the purpose more.
Subscribe to:
Posts (Atom)


