Monday, January 22, 2024

First Module Rebuild - Part 4


The next step in this process was to redo the four barrel defense gun on the lower right.  

The outer form of the build was not changed.  It is four Bar 1 x 8 with Brick 1 x 2 Curved Top End (p/n 30359).  Two are trans clear and two are trans neon orange.  

 To do the wiring on one pair I used this setup.  A large plate for stability.  Two 2 x 2 plates to hold the two 1 x 8 Bars together.

In the previous build, the controller LED channels were capable of greater than 250mA.  The new controller has a 25mA limit.  The previous build was set to 20mA per LED.  Even though I have 10 LED channels in the new controller (vs four for the original controller), with a plan for 12 barrels in the overall build, something has to change.  Looking carefully at the setup in the picture, you can see four limiting resistors, one for each LED, and three wires connecting the LEDs.  The two trans clear 1 x 8 Bars will be on one LED channel and the two trans neon orange 1 x 8 Bars will be on another LED channel.  Having the bottom and top on slightly offset patterns, might produce an interesting effect. 

The wires go down though the plate (unfortunately I had to drill a hole here), through the turntable and out through a 1 x 2 Technic brick.  Then I use two Slope, Curved 4 x 1 x 2/3 Double (p/n 93273) parts to cover the wire before it goes down underneath. 

This picture shows the wire going down by the gear.  I will need to pull the wire back and secure it so that it does not get caught up in the gear.  Because the wire descends through the center of the turntable, there does not need to be any service loop for the wire.  As the gun carriage turns the wire does  not follow.

The final covering.  As the build is finished, the color choices may change a little as I try to balance out where the tiles are Sand Green or Tan.


Thursday, January 18, 2024

Couches


Space Outpost ONE is on a desolate and mostly barren rock/planet (this is very vague and intentional).  Thus from the outside it mostly a sand/dirt color with the Sand Green topping.  But inside in the living areas and the hangers, I have tried to add some color.  Above is the beginning of the recreation room with a seating area.  

There is some space here that needs to be filled.  So I went through the parts to find what colors would support this couch design.  

And this is what I have.  I will need to build some more tables, some with food or drinks.  Then arrange this in the area.  Will probably build a large screen TV also for the area.  The final addition might be some sort of table game, pool, air hockey, shuffle board, etc.  Right now the build table has the Main Defense module in pieces on it.  I need to finish it first.


Tuesday, January 16, 2024

First Module Rebuild - Part 3


The next step here is to put the LED lighting in the section I just finished.


I placed two LED modules (2500mcd) in the space.  You can see the two LEDs in the above photo.  The wire connecting the two LEDs runs in the groove next to the TUBES.  My normal 30 gauge wire.  I used a 1 x 2 modified plate with door rail (p/n 32028) to keep the wire in place.

The I used to two conductor 28 gauge wire to power this.  This wire will run down the back right hand corner.  Being black and in the far corner, it is very hard to see.  This wire the runs along the far left wall of the module.  A 2 x 2 brick with pin plugs into this and attached underneath is a 2 x 2 modified plate with pin hole.  The wire runs through the pin hole, which will keep it tight against the wall and away from the yellow gear you can wee in the picture.  The wire then plugs into the power port for this module. There are also two 1 x 2 modified plates with pin hole on top, and these are used to take up the slack in the wire and keep it taught.  When these pieces are not install, there is sufficient service loop in the wire to be able to work on the LED installation.


This is what it looks like.  Placement of these LEDs is not ideal.  But there are limited choices.  This seems to give the best overall lighting.  It might be better with more front lighting, but there is nothing to connect to. That would leave lighting from below, but somehow that would not look right.  

The original module did not have lighting, so this is far better that what was there before.


Monday, January 15, 2024

First Module Rebuild - Part 2


 Progress on this rebuild.  

In the last blog entry, the module looked like this.  I have made some progress.

I used this large motor, mostly because originally I had the space for it.  I still do, so I am continuing to use it.  But I am changing over the drive to a worm gear.  I used to two small bevel bears to change the axle direction 90 degrees, before attaching the worm gear.

A different view that shows the two bevel gears and their arrangement.

Here is the structure installed.  The brick controller will go on one side, probably the blue.  While they look equally empty, the purple side still needs a gear reduction set installed.

Here you can see the reduction gear set installed.

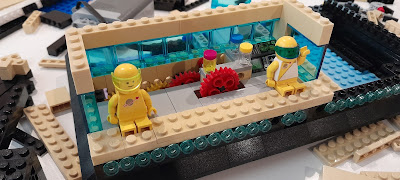
In keeping with the original design, I have two minifigs, one on either end.  They control this portion of the module. The large red gear protruding through the floor is driven by the worm gear.

Better view of the gear reduction set.  Also there is an alternate control panel setup behind the minifig on the right.


This is the completed housing.  It is very similar to the original model.


In the lower left hand corner of the module is connection point for the left tower of the module.  The axle will turn the radar module at the top of this tower.  Unlike the previous version, the wires will run down the tower and into the bottom, where the brick controller will be located.

This shows how the motor was incorporated into the module.

One item that is missing so far is lighting and wiring.  Right now I am just building out the module in rough form.  Then I will determine where the lights will go and how the wires will run through the module.  This will entail some rebuilding to hide the wires as much as possible.


Wednesday, January 10, 2024

Train Progress over Holidays

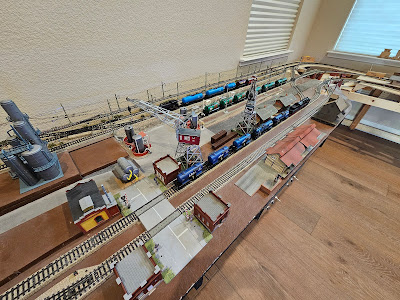
I worked mostly on the oil refinery and oil processing area.  The above pictures shows some of what it looked like.  I finished building the oil refinery models.  Then I built one more large oil tank.  


These two pictures show what the area will look now.  It has four oil processors, two medium size tanks and one large tank.

This picture shows the four oil loading/unloading stations. 

What is left to do:

  • Brick retaining wall around the area.
  • Gravel/ground cover around the facility
  • Stairs to get in and out of the facility
  • Ballast next to all track areas
  • Build a piping system from the refinery to the loading/unloading area
  • Install the overhead lighting


I have been playing with the small side track area near the oil pumps.  This actually on the other side of the layout.  This is what I think is going to happen .  There are two track side oil loading/unloading stations.  Then I will take some of the small oil tanks that I have that are built, but have no home and turn them into small temporary storage near these two pumping stations.  At the end of the left track you can see on small tank placed on its end.  The tank to the right of all the track will be taken apart (probably cut with a Dremel Tool).  Then I can continue to built a small storage area.  Then some piping from the oil pumps themselves will finish out the detail.  Then I just need to place the final road and gravel areas and this corner of the layout will be done.


Tuesday, January 9, 2024

First Module Rebuild - Part 1


This is the first module I built. It formed the basis for all the work that followed.  But it did not conform to the latest module standard I am using.  In particular, the cliff would never fit behind it.


This is actually the first incarnation of this module.  This is before I thought about the Space Outpost.

This is the first implementation in the module form.  It shows the basic look, but not the right color scheme.

And now it looks like this.  

Every module has a name, mostly so I can know what module the Android app is connected to.  This is called Main Defense, since it had the first space guns on it.  I like the two antenna towers, so they will stay.  The supporting buildings in the center and on the right will probably merge into one large structure.  I am also going to keep the gears in the front, since this is what attracts people.

More as the rebuild progresses.


Monday, January 8, 2024

Brick Shows in 2024


March 23-24th in Omaha Nebraska.  This will be the third time we have been there.  This is one of the best shows that we attend.  The light show on Saturday Night for members only is the highlight.


This is the corporate show that travels the country.  It has a large selection of prebuilt MOCs as well as multiple areas of interactive play.  Here are the locations and dates we are looking at.

  • May 4/5  Oklahoma City OK
  • Jul 13/14 Pasadena CA
  • Aug 3/4 Long Beach CA
  • Aug 24/25 San Diego CA
  • Sep 14/15 Sacramento CA


Will this happen?  At this time, it is still unknown what will happen here.  If it does, happen, we will be there.


Friday, January 5, 2024

New Year 2024


Break time is over.  We wish all of you a Happy New Year for 2024.

Here are the upcoming topics and plans through at least May.

  • Finally rebuilding the very first module
  • Finish the cliff area on the left side
  • Work on detailing/texturing the top or plateau areas
  • Build the living quarters with bar
  • Finalize Space Outpost ONE for the coming show year
  • Lego Conventions this year
  • Android updates
  • Train updates
  • Finalize all the electronic projects
  • I need to revisit my solar panel on the outdoor shed 

Sounds like a lot of work for someone who is supposed to be retired.

Thus it is

or actually it is back to work 😏