First I am adding a set of videos of how this was built. In general it shows the base, the infrastructure and then the cliff build. This was the second build of this module, where I added the first horizontal sediment layer. This was all dark tan. The video will show the third build, which is dark tan and medium nougat as shown in these two below.
In the picture directly above, there are two things to point out. One is the use of filler brick, different colored 2 x bricks. I have been picking these up along the way. As long as guarantee they will not be exposed, they are great and inexpensive solution. Second is the wiring. The wiring enters/exits the first floor area near the ceiling through a 1 x 2 technic brick. Then enters near the ceiling of the second floor through the same technic brick.
This is an expanded view of the wiring and the technic bricks.
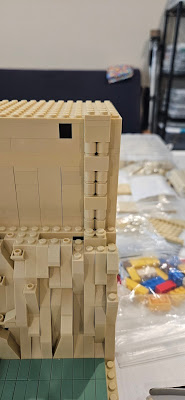
This shows the method for containing the wire. First is a 1 x 2 brick with channel, part number 4216. Then is use 1 x 1 round bricks. As I have shown many times, there is a gap formed by two round bricks, that is sufficiently large for the wire.
This picture highlights that I am alternating the round bricks and the 1 x 2 brick. This is strictly for stability. Unfortunate you cannot use any other type of brick or the channel that is created will be blocked. It would be nice to tie this column into the rest of the build, but given the parts available, this is not an option
Some different views of the rock formation build.
And what it looks like finished.
One thing I added was this electrical conduit and panel control center. There is still more work to do here.


No comments:
Post a Comment