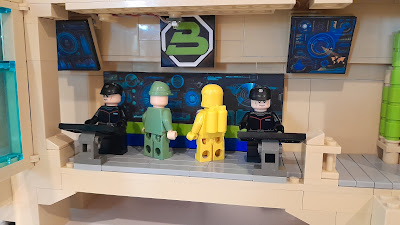
Here is some of the final detail. I applied stickers in four places
- The Blacktron Logo in the center
- Computer screens on either side and up high. Used the standard hinge to give them a tilt down.
- The large screen at eye level.
What I have done so far I will call Level I Detailing. The area to either side of the main screen looks empty. Not sure what I am going to do about that, but that I will call that Level II Detailing. Right now I am making a first pass through the Space base adding detail and making sure the color choices follow the design choices.
Here are a few things I have learned:
- I tried clear gloss labels first. They are OK, but you need a white background, otherwise the colors are washed out. I had intended to use a black background, but that was a complete failure. You could hardly see anything.
- The sheet label I did use was a matte type. So the color is fairly good for my $70 HP2700 inkjet, but they don't pop out. It doesn't really give the true appearance of a computer screen. Next I will try a glossy type of label.
- While in this post, I like the effect that the hinged window created, I am now not liking the pillars. They cover up the the two monitors that are high up. Even I get rid of the pillars, the window frame will still obstruct these. I either remove the windows all together or they need to be extended to completely cover the opening. Maybe with a door?
- The label printing is not as precise as the Lego parts themselves. For example the top mounted screens are 4x4 or 32x32mm. I am using Paint.net (Adobe Illustrator is probably better, but is more complicated than I care to learn) to build a blank canvas that size. I then take pictures that are typically 10x and reduce to that size, both through reduction and some trimming. I then place this graphic in a Word document along with other graphics. After printing I use a rotary cutter to cut them out. After applying, the white edge will sometimes show. I use a black marker to fill in any white showing, which works great considering the sticker is applied to a black tile.
- You can see the light just in front of the Balcktron Logo. The picture below also shows it, this was before all the stickers were applied. Well the light is uneven in this area and is washing out the Blacktron Logo. I need to move this light to between the Blacktron Logo and the monitor. Then balance it with a light on the other side. Not hard, just time.


No comments:
Post a Comment