Showing posts with label Billy Bookcase Hack. Show all posts

Monday, January 3, 2022

Year 2021 in Review

Another year is done.  Did not get as far as I wanted, but things did get done.

Lego Shows

Bricks By the Bay was fun, even if it was virtual.  Learned a lot that I am now applying to the Planetary Space Base.  Here is hoping that this year will be live and in person.

Nebraska Brick Days was an interesting take on a Lego show.  Different than Bricks By The Bay, but had a lot unique items and a completely different vibe.  First live show I have been to in a while, even though I was just an attendee.  There were a lot more people there than I expected.


Brick Fest (San Diego) was also a lot of fun.  Fairly large crowd, but was just a presentation type show.  Really enjoyed talking with the attendees about what we are doing and how I was inspired to build the Planetary Space base.  I have missed this part of the shows.  That is where the real fun is as a presenter.


Brick Building

Built the NES system, then dropped it on the floor and had to rebuild it.  


Continued building on the Planetary Space base.  Started the cliff behind, which is a large undertaking.


Train Building

Made good progress on the train layout.  The Grand kids enjoyed watching the limited run on the video chats.  


Miscellaneous Building

The Billy Bookcase Hack I did has proved to be very useful. In a small space I have created a maximum  amount of storage space that is easily accessible. And as a plus, it looks good also.  


Development Road Map

Brick Buddy 2 is progressing slowly and still needs work.  The bigger issue will be parts availability.  Electronics parts have disappeared from the main stream suppliers and the secondary market can be 10 to 100 times more expensive.  That makes it cost prohibitive to produce right now.

Planetary Space Base made progress enough to continue to show it.

Train Tools did not get anywhere.  I have been working on a new turnout/signal control board.  My original design is rather old at this point and some of the parts are now unavailable.  So with the knowledge of the previous version, I have been working on a design that can be purchased.


On to 2022.


Tuesday, March 9, 2021

Billy Bookcase Hack Part 4

 The Final Two Feet

Well this is the final part.  It was a little longer than a short description.


This closet has 10 foot ceilings.  While that space can only be reached with a stool or a ladder, it is still valuable storage space.  There is a major flaw though in just using this space as shown in the picture.  The two 45 degree bookcase have a triangular opening behind them.  If something falls into this opening, it is 8 feet down.  Retrieving any items that fall down there would be difficult to near impossible.

My solution was to build a topper.  Unfortunately I dont have any pictures of the build process, so I will describe in some detail.  I started with a 4'x8' piece of 1/2" sanded plywood (ACX type)  I purchased this at Home Depot and they cut it length wise at 2'.  The was mostly so I could transport it home.  I then took some 24" wide butcher paper and made a template of both sides.  The left template covered from the back wall to the front wall (within about 2") and the right template from the back wall to the end of the bookcase on that side.

Placed the templates on the two pieces of 1/2" plywood and cut them out using a Dremel Saw-Max and a hand held Jig saw.  Performed a dry fit and made some minor tweaks to the cuts.  To provide proper support in the far corners, I placed two ledger boards of  1"x2"lumber in each corner to provide the corner support.

Putting these plywood pieces in for the dry fit, was difficult, especially the left side.  There was not a lot of room to maneuver.  This led me to build this last two feet with dowels so that it could be assembled in place if necessary. Using standard melamine shelving, I ripped this down to same width as the Billy Bookcases are deep.  On the left side of the closet I used four pieces, one  18" long and two 22" long as vertical support pieces and then one long piece as the top.  I did cut dadoes in the two 22" vertical pieces for the top piece.  The reason for the 22" will be explained later.  Finally I cut a piece of the 1/2' sanded plywood to form a back.  To better accommodate the back, I cut rabbits or reduced the width in all the melamine support pieces.  The one center vertical support piece I lined up with the vertical side pieces of the bookcases below.  This is where the 30" and 15" bookcase meet.  

NOTE: In retrospect I should have lined this up with right side of the 30" bookcase instead of the left side of the 15" bookcase.  If you know what to look for, you can see a large gap under the vertical style that covers this vertical piece.  This gap would have been on the far side when looking at this area from the closet entrance and would have looked much better.

The right side of the closet was similar, except there was no vertical support piece, just the two 22" end pieces and the long top piece.  The remainder was built the same as the left side.

I knew from the dry fit that the left side would have to go in first.  I would need the space on the right side to maneuver this into place.  After a few unsuccessful tries to place the assembled shelf in place, I gave up.  It was not going to fit.  I was fairly certain that without the bottom plywood, it would fit.  So I took a chance and screwed in the top melamine piece and the back plywood piece.  Also this would be needed for this shelf piece to have the necessary stability to be maneuvered into place.  The bottom relied on the dowels and the weight of the upper part.  I then placed the bottom plywood piece in place with the dowels protruding.  This was the easy part.  Through some careful maneuvering and a little help, I managed to move the shelf into place and it slipped down onto the dowels.  I then realized I could slide the entire shelf out.  That allowed me to place screws from the bottom through the plywood and into the left vertical support and the middle vertical support.  

I carefully moved the entire assembly back into place.  At this point I secured the entire assembly by using screws inserted into the vertical sides of the bookcase height extensions below.  This is why I was not concerned about the attachment of the height extensions.  These two top shelves secure and stabilize the extensions.  The right side moved into place as single piece and was attached to the height extensions.

The final part was to finish off the bookcase trim.  Finished off the bottom with the baseboard I removed from the closet in the very beginning.  Installed a 4" piece of melamine on the top in the shelf between the to two 22" vertical supports.  This was done on both sides.  A small soffit was built out of the melamine and place on the back wall between the two sides.  This was needed to support the crown moulding.  I then wrapped this top section with high density MDF casing material to provide the final support for the crown moulding.  To cover up the vertical joints between the individual bookcases, I ripped down high density MDF casing and place this over the joints. Finally I did the same thing to cover the horizontal transitional between the top of the height extensions and the 1/2" plywood.  

The final result is shown below.  A careful look will show that two vertical styles are missing.  Some of the items in the back wall bookcase consume the entire width of the bookcase.   For the styles to work, they need to be cut with a 22.5 degree angle on both sides.  That would be a trapezoid with about a 1" base and a less than 3/4" top.  Ripping this on the table saw was not something I was up for right now.  So I have left them off while I use the bookcase and determine what might happen in the future.


To Do List
  1. Not sure I like the Sheetrock showing on the back wall at the top.  Maybe I will place melamine board over this or just paint this area white.
  2. Make a final decision about the last two styles.
  3. Some painting to coverup some dings I created while installing the bookcases.


Sunday, March 7, 2021

Billy Bookcase Hack Part 3

 Modifying a Billy Bookcase

As you can see from this picture, I have about a 10" opening.  IKEA does not have anything that will fit in there.  So I took a 15" Bill Bookcase and cut it down to fit.  Here is how I did that.  To be fair I do have a table saw and sliding compound Miter saw. You can probably do this with a circular saw or one of the Dremel Saw-Max tools or something similar.

I first finished the space by putting in the top and bottom triangular support pieces, just as I had done before.


This allowed me to place the bookcase side pieces in the space and have supports for them.  Then I carefully measured the shelf width at the bottom, middle and top, at both the front and back of the bookcase.  All the measurements were within 1/32" of each other, thus to this point everything was still level and square. 

Quick review of Billy Bookcase construction.  There are two sides, three fixed shelves, four moveable shelves, a toe kick and the back.  The three fixed shelves and toe kick are attached with dowels to the sides.  In addition, the three fixed shelves have CAM screws to tighten the connection between the shelves and the sides.  The movable shelves rest on custom supports that are inserted into the row of holes on either side of the bookcase.

Using the earlier width measurements, I cut down fixed shelves and the toe kick on the miter saw.  Then I took one of the scrap cuts and cut it down to just under an inch as shown here.

This allowed for the pre-drilled holes to go all the way through.  Then I clamped this scrap piece to the side of the fixed shelf I just cut to the new length as shown here.


This scrap piece is now a drill guide for the dowel holes.  After doing a significant amount of research on how to drill out CAM screw openings, I decided against this.  Since this is a built in and moving it is very low probability, I decide to just use screws to secure the fixed shelving.  Taking it apart was not needed.  The dowels provide the guides and helped hold the bookcase together while I was putting in the construction screws.


I only used the construction screws on the side that was cut, the CAM screws are still used on the other side.  This will become obvious why later.  Just I had done on the other bookcases, I put a plywood backer on the back to help secure the bookcase to the wall.  There was one stud behind the bookcase that could be used.  I cut down the width of the cardboard back on the table saw to the correct width and nailed it into place as you normally would. 


At this point the bookcase was stable, but I wanted it to be rock solid.  I already knew with a high degree of certainty what items would be placed where in the bookcase.  Thus I decided to fix all the shelves with construction screws.  This was probably not necessary, but I was anticipating that putting the bookcase into the space was not going to be easy and I wanted it to be as stable as possible.  First I cut the movable shelves to the correct width.  I cut both sides of the shelves to remove the custom mounting holes IKEA uses for these shelves.  
 
NOTE: If you wanted movable shelves, I would still cut both sides and use standard cabinet shelving pins for supports.  Cutting the custom holes with normal DIY tools will present challenges. 

Again I used the bookshelf adjustable holes as guides.  Drilled them through to the other side very carefully.  Generally I clamped on a scrap board over where the drill will come out, this would keep the melamine veneer from shattering when the drill bit came through. 

As you can see from these two photos, I used right angle clamps to position the shelf in all three dimension, then used two construction screws on each side to secure the shelf.  Then did the same for the other three shelves. 

The fit was a very good friction fit, which is what was needed.  After placing the bookcase in the space, I secured it to the floor and the triangular plywood support pieces at the top, just as the other 45 degree bookcases were.  Finally I secured the bookcase to the back wall with two construction screws into the stud.

Here it is in place.  You can also see that the standard Billy Bookcase height extensions are on the other four bookcases. 

Finally I used a standard height extension and modified it in exactly the same way I did the bookcase.  All of these height extensions are secured to the lower bookcase with CAM screws.  This was good enough, especially with the final step to fill in the last 2 feet to the ceiling.


Friday, March 5, 2021

Billy Bookcase Hack Part 2

Before the Billy Bookcases could be placed, I needed to figure out a method to secure these bookcases to the wall.  Anyone who has ever assembled a Billy Bookcase knows that the back of the bookcase is essentially a very high density cardboard.  This back slides into the back of the bookcase in slots and is secured by nails into the top, bottom and middle shelf.  However using this to secure the bookcase to the wall is not practical.  IKEA provides L brackets for this purpose.  |These are attached to the top and connected to the wall.  But these will not work for a built in look.  

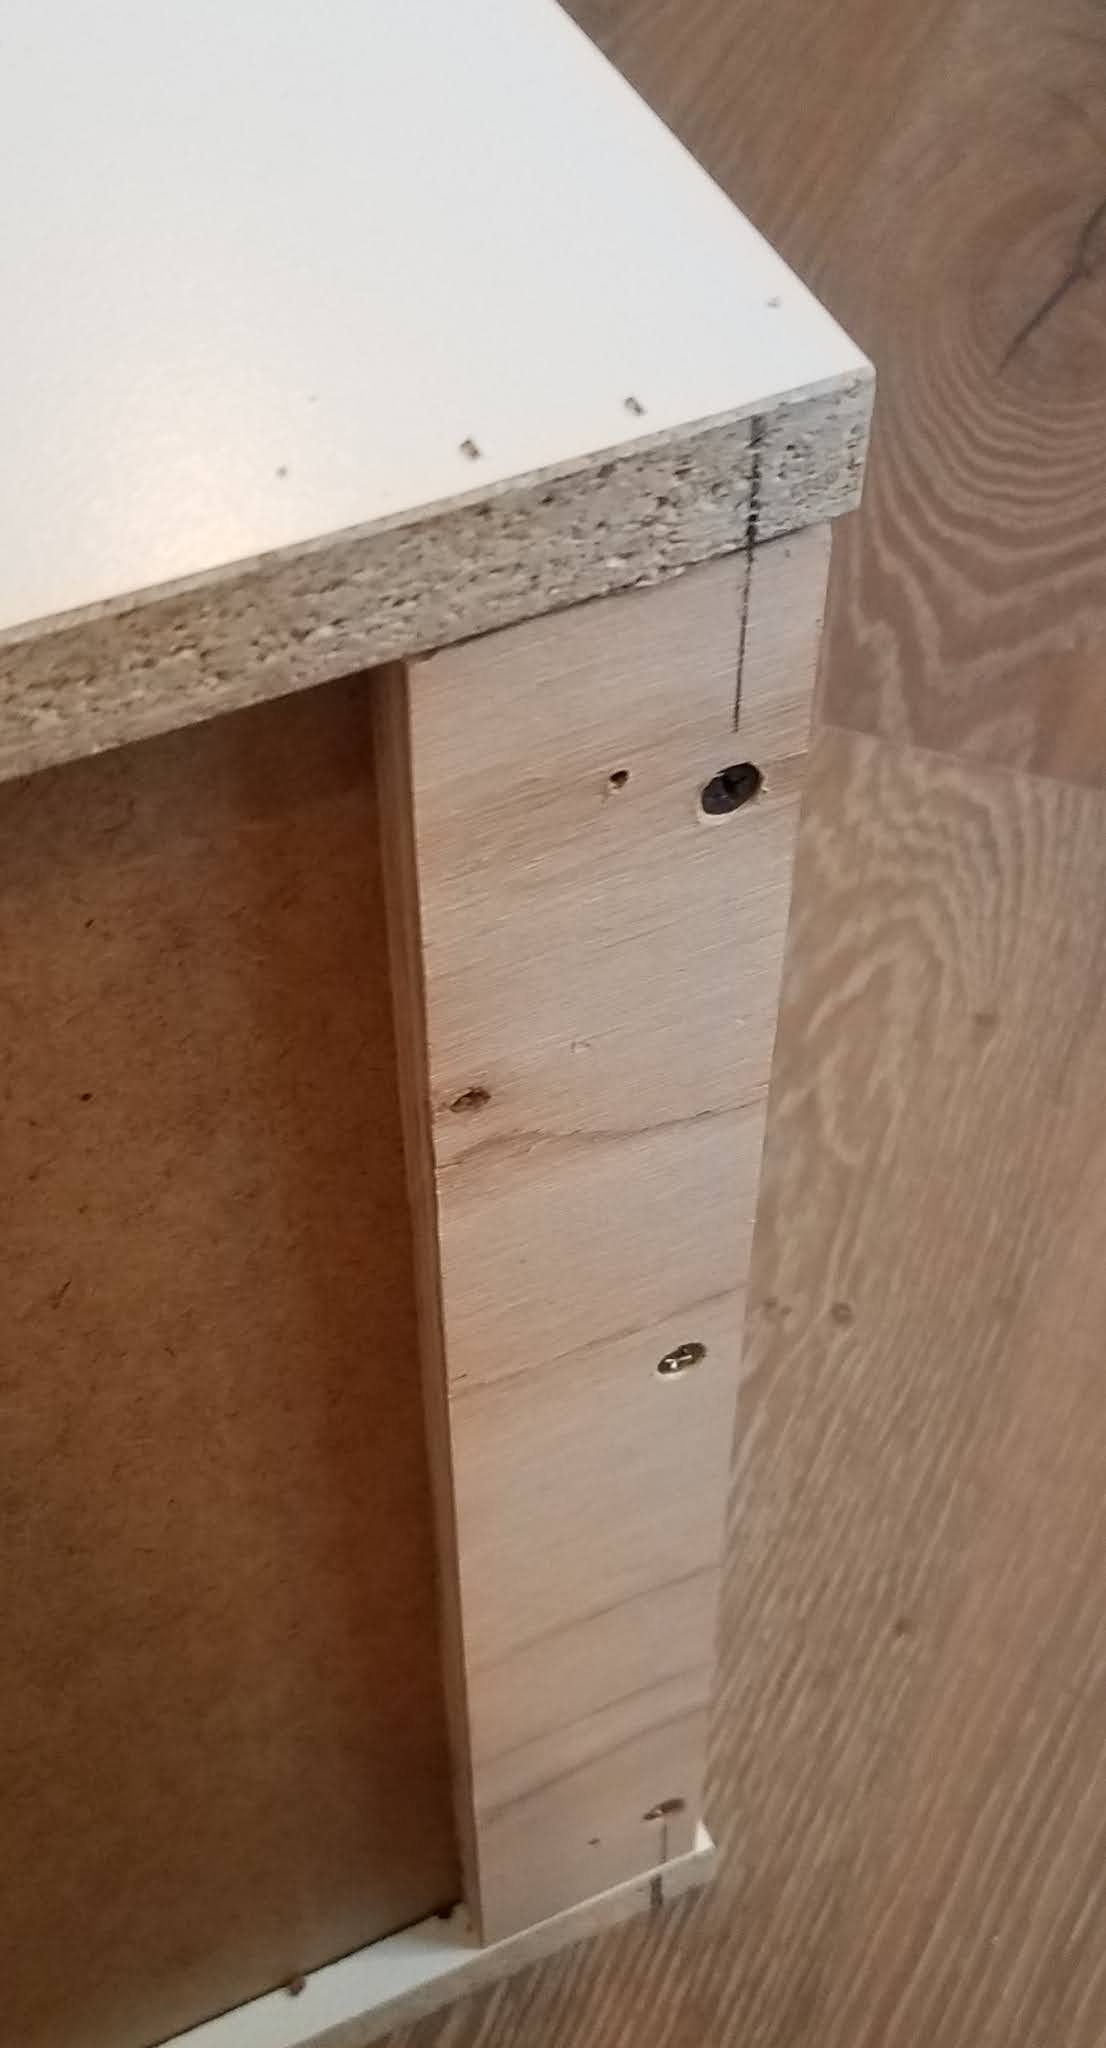
The gap in the back is about 1/2" and with 1/2" plywood undersized these days, the fit was just perfect.  I cut plywood the exact width and 3" wide.  Any width will do, you just need enough room to be able to get a tool under the shelves to drive the screws into the wall.  I started by marking the center of the shelf on the back as shown here.


Then I attached the plywood backer to the shelf using construction screws as seen here.

Finally I used a nail gun to secure the sides of the bookcase to the plywood backer.


What this does is provide a place to secure the bookcase to the studs in the wall just like any other cabinet would be attached.

This solved securing the bookcases to the walls for the three bookcases that are flat against the wall, two 15" bookcases on either side and the 30" bookcase.  But the two 15" bookcases that are on 45 degree angles and the highly customized one in the center back, this wont help.  The two 45 degree bookcases only touch the wall on their corners and the highly customized on is 9 3/4" wide which is between the studs.

I went through several ideas.  My first thought was to build a triangular frame out of 1x4 that would attach in the corner.  The bookcase would attach to the hypotenuse of the triangle.  The major problem with this is Sheetrock corners are not perfectly square.  I spent several days measuring, remembering what I learned in geometry and trigonometry and then measuring again.  This would have lead to multiple issues of trying to align the bookcases.  So I gave up on this idea after a thorough mental exercise.  I briefly played with a similar idea using a triangular piece of plywood, thinking this would be easier to match the Sheetrock corner.  I gave this up when I could not figure out a method for keeping this parallel to the floor.  (The triangular frame had the same problem, but weighed less than 1/2" or 3/4" plywood.)  

The method I settled on was to connect the bookcases to the floor and to the next book case.  Here is the beginnings of the floor connection.

This method is composed of these parts.  A triangular piece of plywood (45 degree right triangle) used at the bottom and at the top (more on this later) and 1x4 piece of lumber.  The 1x4 is ripped down to the correct height to fit under the bottom shelf. The length is about 12" which is 3/4 the width of the shelf.  Needed some wiggle room during placement.  I placed this in the center of the bookcase and where I could attach to the frame I built on the floor. Also wanted to minimize the exposure of screw heads, hoping that whatever was placed on the bottom shelf would cover the screw heads up.

Next is a triangular piece of  plywood that is attached to the floor frame and placed up against the bookcase attached to the wall.  This creates a "stop" that the 45 degree bookcase presses up against.  What I determined was without this, the bookcase would slide around and positioning it became difficult.  This piece of plywood provides the necessary support to keep the bottom of bookcase in place.

But as you can imagine the top of the Billy bookcase is moving around.  The obvious answer was to place another triangular piece of plywood near the top.  These two pieces, at the bottom and top create a wall that the 45 degree bookcase is position against. Connecting the bottom piece was easy, the top I had to get more creative.

I started with identical pieces at the bottom and the top.  I decided to attach the top piece using the top shelf support hole in the Billy bookcase.  This hole would provide consistent placement from bookcase to bookcase, since these Billy Bookcases are now completely made by robots and CNC machines.  This required drilling a complimentary hole that did not exist, for whatever reason the top two holes are missing in the back.  I used 1 1/2" Truss type screws with sharp points.

I then drew a line that was 3/8" below the two holes and checked it for level, which it was.  This line is the bottom of the triangular plywood support piece, which is 3/4" thick.

 
Now I did multiple dry fits, to understand where the plywood support piece needed to be.  Positioning this is critical since the edges of the two bookcases need to just touch and the plywood support piece slides in so it will pull the two bookcases together.  I inserted the screws until about 1/8" of the screw was exposed on the outside of the bookcase.  Then I carefully lined up the plywood support as I had done in the previous dry fits and pressed it against the outside of the Billy bookcase.  This made two slight impressions as seen below.

Then I drilled pilot holes for the screws.  This made aligning the plywood support piece easy and then the screws pulled it tight to the bookcase.  Checked for level and perpendicular to the bookcase, all good.  This method was devised for one person, if you have competent help, you can probably do this a lot faster. Here is what it looks like.


Once the top triangular support piece was in place on the adjoining bookcase, I prepared the holes in the 45 degree bookcase at the top and in the bottom, then set it in place.  A little struggling with placement, screwed the bottom to the support with two construction screws and then the two Truss head screws at the top and it was in place.  Rinse and repeat and I am ready for the highly customized bookcase at the back wall.


Next I tackle the bookcase at the back wall.


Thursday, March 4, 2021

Billy Bookcase Hack Part 1

One of the first items to fixed was the closet in the office/ Brick Build Room.  This closet was 6' deep, 4' 6" wide, 10' high and the 28" door opens in.  We needed horizontal space to store items.  This closet also came with a power plug and network connection.  

DISCLAIMER:  I reviewed multiple IKEA Hacks on the WEB.  The best one was an Ask This Old House where they used the Billy Bookcase (but never mentioned the name) and installed on one side of the room on either side of a window.  (see here)  In almost every case of these various Hacks, there were comments about the durability of the bookcase with heavy objects on the shelves.  And if you are going to all this trouble, why not just build custom bookcases.  Well for one is the cost and then the time.  Of the six bookcases used, only one is 30", the remainder are 15" or shorter.  On the 30" bookcase, we are careful what we put there.  Our biggest problem was availability.  Seems with the lock downs, everyone was remodeling their homes and at least on the West Coast getting these bookcases was problematic.

First requirement was to have a built in appearance, which meant extending the baseboard and placing styles on the bookcase to achieve this look.  Second was to decide the arrangement.  Placing Billy Bookcases on both long walls was the easiest approach to this.  The other approach was to curve the bookcases around the back.  IKEA does have metal attachments to accomplish this setup, where the bookcase is at 45 degrees and thus turns the corner.  After analyzing both approaches, the curved approach around the back would give a few more feet of horizontal space than just lining the two long walls.  While this curved approach had a very nice aesthetic appeal, it was going to be much more difficult.  The bookcase against the far wall would have to be heavily customized, plus handling the 45 degree placement. 

Determining the layout was the first task.  The long walls were actually different lengths since the door interfered with the right wall.  I purchased the IKEA 45 degree brackets and four 15" wide Billy Bookcases to start to determine the exact measurements.  In the end I did not use these brackets since they raised the bookcase off the floor almost an 1/8".  That is OK on carpet, but on solid floor that would never work.   Using both the IKEA website and actual measurements, I determined this would be the layout.  Starting on the right wall and going around to the left, 15" bookcase against the right wall, 15" bookcase at 45 degrees, modified 15" bookcase (~8.5" wide) against the back wall, 15" bookcase at 45 degrees, 15" bookcase against the left wall and finally a 30" bookcase against the left wall.

To make the baseboard seamless with the rest of the house, the bookcases needed to be raised 1.75".  To accomplish this I used 1/2" and plywood and 1" by lumber that I ripped down to the correct width.  Since the 1/2" was nominal, I actually measured the plywood and then compensated with the 1" by lumber.  This resulted in the framing below.


These two show the progress and finished framing.   The frame is connected to the walls with screws, which makes this framing very secure.


Next will be to start fitting the bookcases.


Wednesday, March 3, 2021

We Are Back

It has been an interesting few months.  Since our last post we moved again and we have spent the time moving in and setting up for the long haul.  This entailed some modifications to the residence and these modifications have kept us busy.  Between avoiding the virus and chasing down materials, it has taken some time.

As we get restarted here, we will cover some old ground plus a few of things we did in the last few months.  Here is the agenda for the next few weeks, in no particular order.

  • Show how we are setting up the work areas.
  • A short description of the  Billy Bookcase Hack we did in one closet
  • A review of the current product line
  • What new items we are working on

It will be fun getting back to it.