Friday, November 10, 2023

Curved Cliff - Part 4


More progress, but this time it is not actually on the cliff wall or the plateaus.  This work was all in the front and concerned the platform connectors.  This picture shows the platform connectors I was using for the development work.  The two straight connectors are the ones I have used in the display for a while.  They are shown below.

The same goes for the small angle platform connector shown below.

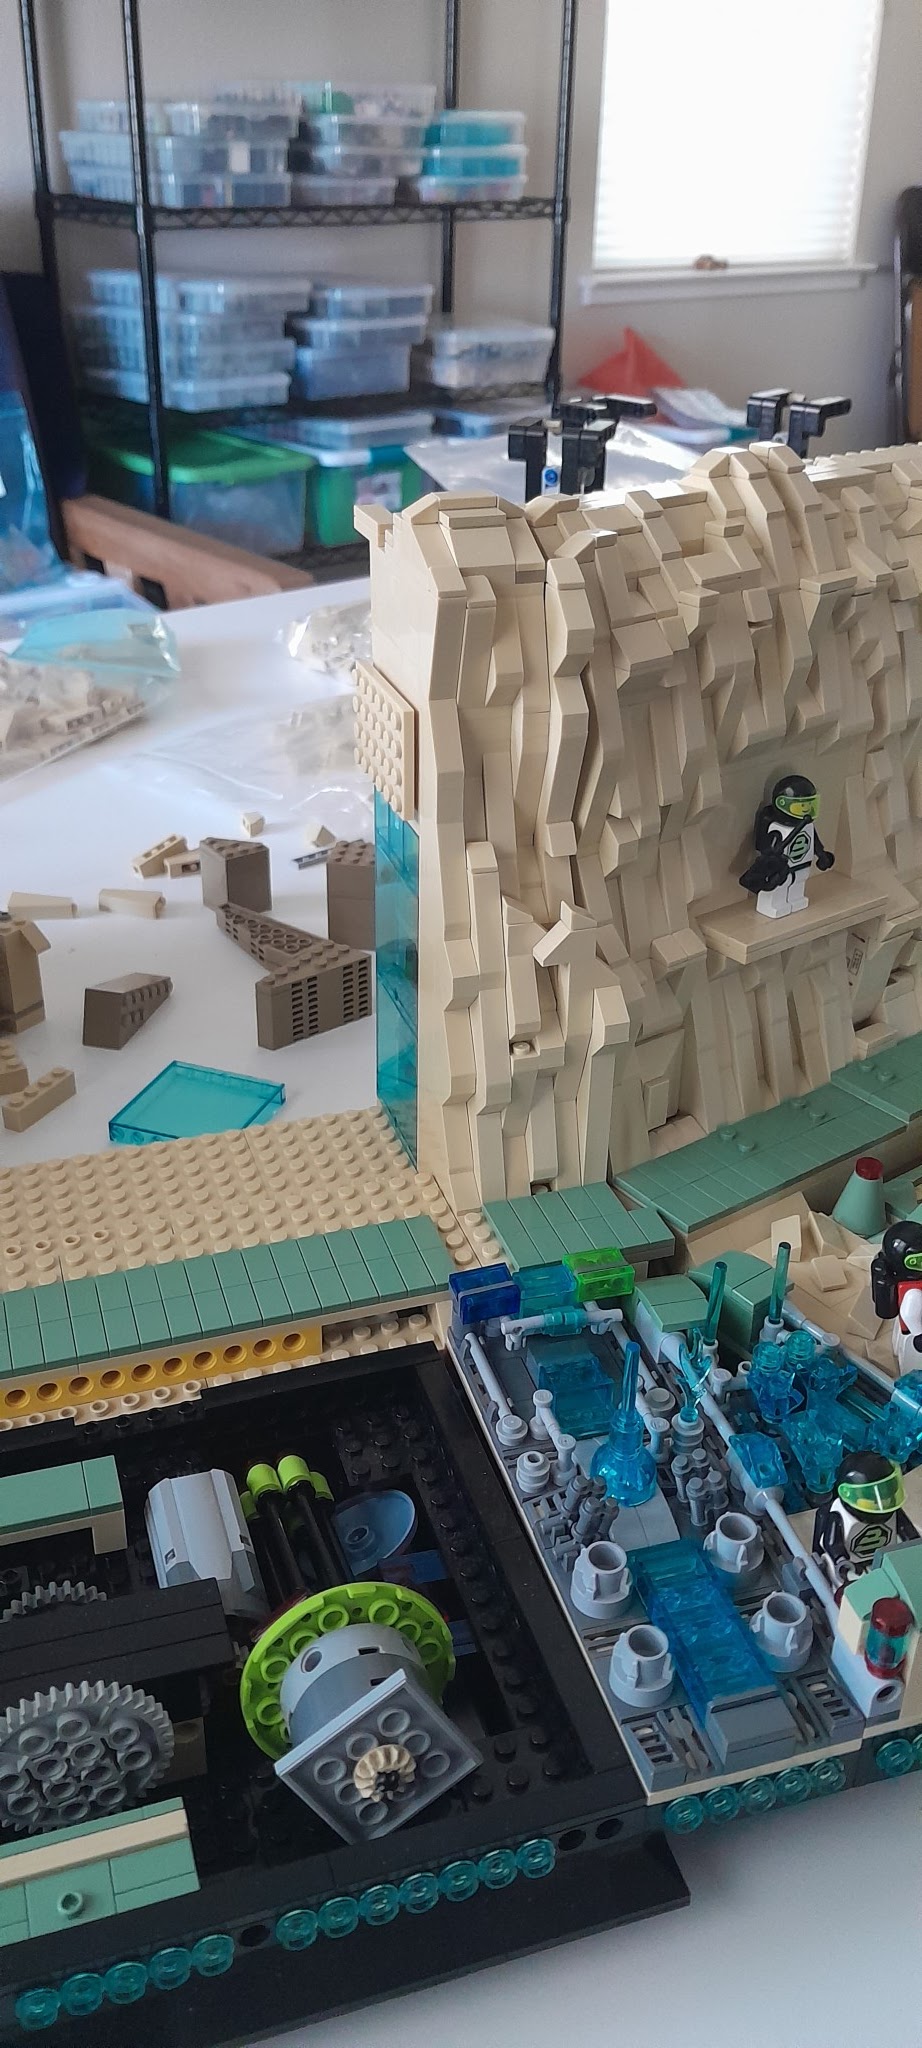
The angle connector on the left side was a modified version of the large angle platform connector. I needed it to be 22.5 degrees so the standard 45 degree cut wedge plate pieces would work.  After looking at these and how they were performing, I decided that it was time to build a custom platform connector (actually two) for this curved portion.  The total distance covered was too great for just Technic pins to support the connections.  Buy building customs platform connectors, I can reinforce the platform connector so there is no sag.  And, I was going to have to replace these for the display if I used them, so I was going to have to build something.  Might as well as be these new custom platform connectors.

Here is where I ended up.  Right now they are just functional, no detail has been added.


Here are closeups of the custom platform connectors.  The largest area in the turn was added to the platform in front of the curved cliff section.  


Here you can see what was replaced.

Detailing these platform connectors is the next step.  These are much bigger than a standard platform connector.  On the left I am thinking about another ramp similar to the one I did for the floating platform.  Plus a staircase up to the walkway that goes around the display.  This could be some kind of loading dock.  The other one will be some variation of what it replaced, vents and a control panel.  A maintenance station would be the best description.  


Thursday, November 9, 2023

Brickpalooza


                A LEGO® Fan Festival, Exhibition, and Celebration

December 9, 2023

Placer Valley Event Center

Click here for more Information


This is the our next event.  Hope to see you there.


Wednesday, November 8, 2023

Curved Cliff - Part 3

More progress.  The actual cliff wall is not progressing, though.  Mainly due to a lack of parts.  Bricklink's closing temporarily has put me behind schedule.  While I had placed my orders on 11/3, it was right before the shutdown.  Two of the three orders were downloaded by the stores, but one did not get there before the shutdown and that one had most of the cliff pieces.  They are waiting for Bricklink to come back up so they can access the order.  So now I am working on the back side of this cliff wall section.

Here is the top of the plateau. The section on the left is the hanger section for the last straight section.  Then comes the first turn (corner section) and then finally the space port.  The space port plateau will have a corner cut off as this shows.  

From this view you can see how the corner section plateau lines up with the last section plateau.  The only possible connection will be to use a hinge plate to tie the two plateaus together.  This mechanical connection will have to be disguised by the terraforming of the plateau that is yet to come.  The same is true for the mechanical connection between the corner section plateau and the Space Port plateau.

You will notice that some of the wedge plates are Dark Tan.  Well not every wedge plate comes in Tan, so there are going to be compromises.  But I have used Dark Tan in the cliff wall to change it up some.  And I will used some Dark Tan in the plateau terraforming.  So it is not really out of place.

Here is a view under the plateau.  Some gym equipment has been moved in.  It is obvious that the second level on the curved section cliff and the Space Port cliff is too high.  The equipment just barely fits.  These two second levels need to come down at least one full brick height if not a little more.  Just need to make sure that is not too low, such that it starts to cramp the first floor.  

Squeeze here and it pops out of there.😎


Monday, November 6, 2023

Curved Cliff - Part 2


Progress is being made.  The right side section that interfaces the turn is done for now.  Here are some different views.


The interface is obvious, unfortunately.  But it is ot horrible.  If this were a permanent type display, something more might be done.  But since I need to move the display and this is where the break is planned, we will have to live with it for now.  In time there might be a better way to do this, but rectangular bricks and not a 90 degree turn just don't mix.

Here are two more pictures that show the progress in building.


The right side (front view) is the acute angle bridge.  I needed something to go into that space that was small since it is only a few studs wide.

 
I came up with this.  Not sure what it is yet.  It is obviously storage of some kind.  These containers are found all over the Space Outpost, so they must be important.

Finally the bottom level of this section will be the cafeteria and open up to the dining hall.  The second level will be the gym.   More on these two later.


Friday, November 3, 2023

Brick Buddy ONE Upgrade


For some unknown reason, I started upgrading the firmware on the Brick Buddy ONE. Since I had done all of this software work on consolidation and refactoring, I thought lets do it.  Plus I need a 4 motor controller and Brick Buddy TWO is still a long way from being ready.  Thus during the road trip, I started working on upgrading and refactoring.

Brick Buddy ONE was done over five years ago and was written using the C18 compiler.  First task was to transition to the XC8 compiler.  Most of this went fairly smooth as I don't try to rewrite the whole thing and then start compiling.  I stripped it down to just the startup code and worked on it until it compiled without error.  This is the main loop

    while(1)
    {
        ProcessIO();
        PWMCtrl_Tasks();
        SCRIPT_Tasks();
        BT_Tasks();
        USB_AppTasks();
        APP_Tasks();
        BlinkStatus();
    }//end while

So what I do is comment all of these out and then start adding them in one at a time.  Solve the compile issues and move on to the next.  By the end of the road trip, I had left to do Script and Bluetooth.

Before proceeding on adding the remainder in, I connected to the USB port and started testing out the USB interface to the PC program.   Once the LEDs and Motors worked, it was time to get back including the remainder of the code.

One interesting thing that happened was that uint16_t type could not be found.  I got around it by using uint32_t since I was only compiling and not actually running at the time.  Eventually to solve this error I had to delete the project and start over again.  There must have been something in the project file from C18 that was getting in the way.  Once I built the new project, uint16_t no longer caused issues.

Next issue was FLASH size.  The PIC18F45K50 only has 32K of program FLASH, compared to the 64K of better in all the other controllers.  Changing the controller is not an option for the simple reason that the 18F45K50 is the only crystal less USB PIC.  There are multiple larger USB PICs, but all require a crystal for USB 2.0.  At optimization level 0, I exceeded the memory towards the end of the BT implementation and before the Script implementation.  At optimization level 1, I have about 7K left after BT implementation,  Hopefully that will be enough, else I will have to buy a monthly XC8 license to compile this.  Also means that the bootloader may not fit any more, but we shall see.  I also need to make a pass through the code and see if there is any compaction I can do.

Right now I have basic USB interface working and some of the BTLE interface working.  Maybe another week to finish this.

What do I get out of this.  Well a common User Interface for both the PC and Android.  Right now, the Android Interface only works on the new designs and I have limited control over all of the Brick Buddy ONEs I am using.  


Thursday, November 2, 2023

Lego Sort from Road Trip


Finished sorting all the acquired LEGO from the trip.

I generally do a rough sort by color and then by type-plates, bricks, tiles and other.  But since this haul was overwhelming tan, the other colors were just thrown into a tub and sorted by part type later.

Here is am still trying to sort through the large tub of tan.

It is mostly sorted here.  I thought at the time I had gotten enough 2 x 6 and 2 x 4 tan bricks that I needed for the next cliff builds.  Turns out I went through them very fast.  So now I am searching Bricklink trying to find the least cost at one place so as not to get eaten by shipping costs.

I know I have said this before, but it bears repeating if only to confirm what other people might be seeing.  If you buy bulk bricks like I do, then you need to prepare yourself for spending time sorting and putting them away.  I would say at least 10% of my time goes into the sorting and storing process.  Is it worth it?  Well a piece that you have but cannot find is not very valuable. 😎


Wednesday, November 1, 2023

Curved Cliff - Part 1

This hole exists on both ends of the display.  There needs to be a connecting cliff between the last module on the front and the next module (often the last module).  But turning a corner at less than 90 degrees with strictly rectangular pieces is difficult.

My first attempt at just building the base.  First I needed to add the six stud wide rectangular spacers.  The space shown above in the first two pictures is just too small to do anything useful with.  On either side of the module you can see these spacers.  (Since these spacers are ones needed elsewhere, I will have to replace them).  The turning module on the right side is the small angle.  Using either the small angle or the large angle one, made it too difficult to find the mating wedge plates for the back side.  So I used a 45 degree wedge plate to form the second angle.  I will discuss this build in a another blog post later.  For now what you see is a place holder so I can get through the more difficult part of building a cliff wall.

 
Here I added to the substructure and began the walk way.  This had to be broken up so that it would fit in the standard Sterlite box.  The connection is located where the four Technic bricks are.  The break is in the middle.  I did not like where the breaks were and I am concerned that there will inefficient use of packing space.  I then decide the center piece would be as wide as it could be on the far back end.  That is mating piece on either side of the center piece would be where the angle ends (not including the hanger sections).  
 
This is the final sectioning of the substructure.
This completes the substructure with the walkway.  The two places where there are no Sand Green tiles are the joints and will be covered with 2 x 4 tiles at display assembly.  Next I an going to start building the cliff wall.  When that is complete, I hope to have a better idea of how the area behind the cliff will look.