

A few weeks ago I mused on whether I had a crazy idea or something cool (Oh so 1960s).
Well I think it is very cool, especially in its first incarnation. The picture above was the 3D rendering of the assembly. Here is an assembled PCB

This is the size of 1x2 Brick plate. If you solder from the back, as I will in implementation, then a 1x1 plate/tile will fit in the center. If you solder strictly on the top, then a 1x2 plate/tile will fit. The four solder points on the right are a little tight and some care will have to be taken when attaching wires. Using a 250W Weller Soldering gun and 0.1" diameter solder will be challenging.

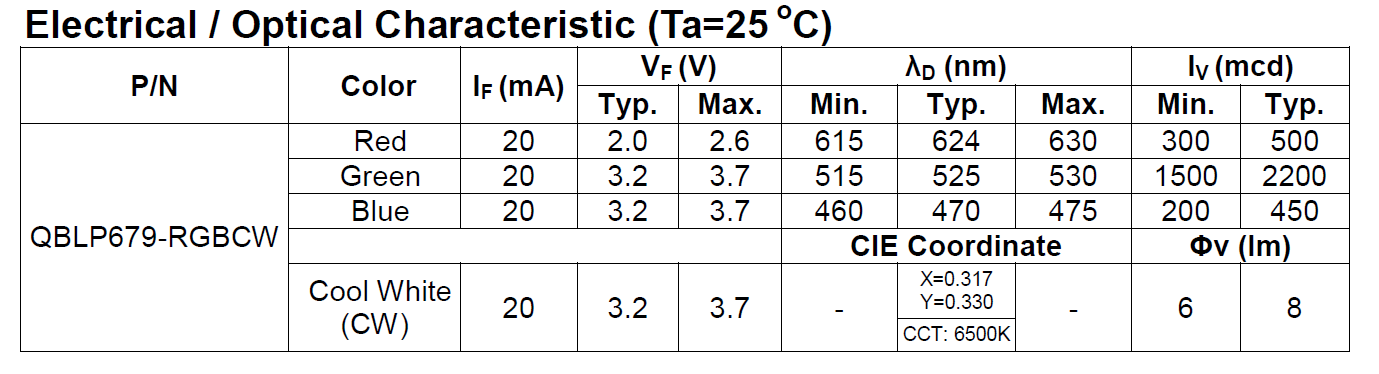
The different colors on this discrete part have different illumination characteristics as shown here.
I needed something to test in. I have been playing with this Design.

I started modifying this to accommodate the LED PCB. First it needed to be in the center of the 8x8 plate. Then I needed a
way to suspend the 2x2 transparent light blue round bricks over the
center, so that the light will go straight up the column and out the spire (Antenna 4H) on top. Finally there was going to be some stack up issues when using plates and bricks and I need a way to extend the round bricks.

Here is the first step. A 4x4 plate with a 1x1 round plate in the center. The round plate is needed, since it fits inside the 4 studs at the center of the 4x4 plate. I glued a 1x2 tile on to the back of the PCB. Since there are no tubes on the back of that tile, it can slide on the 1x1 round plate. After centering the PCB I placed 1x2 bricks on the left, right side and the top left corener. I used 1x1 round plates in stacks of three to finish the top section. This allows the wires to pass through the gaps. Then at the bottom (in the picture above orientation) I used 1x1 round bricks at the corners and the same stacks of 1x1 round plates in the two center positions. This was needed to accommodate the wires that I soldered on the top, with the wires coming straight off the PCB. If I had soldered then from the bottom, then a 1x4 brick would have worked.

This picture shows the 4x4 assembly attached to the 8x8 plate that is on the bottom and the surround support wall, with a gap for the wires. Now I need to support the transparent round bricks. Modifying a brick was a possibility, but then I remembered technic plates. They don't come in Tan, but I am not sure that matters here.

This shows the technic plate in place. Next was a mismatch in the round brick height and the large top (8x8 dish) that goes on top. The round bricks actually hold this top in place, it doesn't seem to want to grab the studs on the macaroni pieces. In the stack up that was needed to capture the LED PCB and the technic plate caused the transparent round bricks to be on plate short. So I placed four light blue transparent 1x1 round plates on the technic plate as the picture above shows. At first I thought I would have to drill out the technic plate hole to let more light through. Then these four 1x1 plates sort of restrict it even more. But as the videos below show, there is plenty of light.
So that brings back to this.
You can see the Light Buddy 2 controller on the right.I am not sure this is the final iteration of this design. I would prefer to have the controller embedded in the unit. Four of the six LED Channels are used, so there is no need to have it control other devices. With some more thought, I am sure I can come up with other uses for those two LED channels.
So here are the videos. The first is in minimal background light and the second is almost full background light. Unfortunately the camera does not have a large amount of dynamic range in light. Thus the LED lights tend to over power the camera. It looks much better live, but these videos give a good indication of what it can do.
Now that I see what this can do, I already have come up with RGB specific effects. More on that later.
Minimal background light.
No comments:
Post a Comment